Friday, 19 April 2013

Bioshock woo

Well its the first time ive got a game soon after its release and ive played it through twice and it is amazing I loved almost every second of it. The characters, although stylized so not initially my thing, were amazingly beautiful, and one of the reasons I actually felt invested in this game was Booker Dewitt and the evolving relationship between him and Elizabeth.
The story was intricate, with an ending that at first I was unsure of and with music that pulled it all together well. So much so that i even sourced, like I'm sure many other people have done, the barbershop quartet rendition of God only knows. 
The only downside of this game as Im sure anyone who has played mass effect and other choice heavy games will know that when given decisions to make you kind of hope they matter, and in Bioshock you didnt make more of an impact other than getting Booker a nice wound in his hand (or not). 
However this is only one of few downfalls in an otherwise engaging game.
On a final note I would suggest this game for anyone who has had issues with followers in other games like in Skyrim etc as it makes a change to have someone helping rather than hindering your progress.

Friday, 12 April 2013

first new character

This is my first finished character since my new laptop. I'm generally happy with it but since I'm settling into the new method and the process I'm sure I'l look back in a few weeks and find massive fault with it but in my eyes that's a good thing. If I went along thinking my work was great and being unable to see faults i would never improve.

The new improved method!

This head was created in 2 and a half hours the old fashioned strip modelling method would have taken alot longer and probably would have been less physically accurate this is proof that this method is better than the previous.

Tuesday, 19 March 2013

Whilst my laptop was down....

during the time between laptops I had to do something. So draw and sculpt and make things was on the the agenda:

This was drawn after i watched the video by feng zhu on drawing.


This is a speed sketch I was experimenting with fast rendering techniques.


This is a sculpey model of the 3d dreaded women  i made the chair is currently unfinished but the model is something i am proud of.

Monday, 18 March 2013

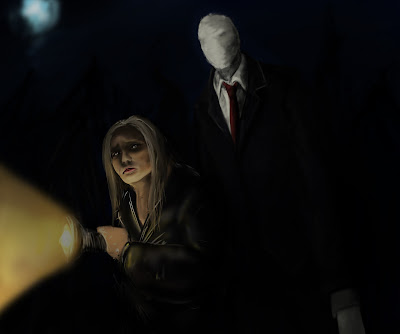
Since playing this game http://www.slenderarrival.com/ I have become obsessed with slender man so heres a drawing:
Slender Man katie Beardmore
Slender man
Speed paint over the space of 3 days at 15 minutes a go

New work process try it..

Well recently my good friend Arron was singing the praises of starting the modelling process in z-brush as opposed to the long drawn out task of starting from complete scratch in max. Now naturally i was a bit dubious as this has been a tried and tested method and has worked well for me. However I thought id give it a go (not least because z brush was the only programme on my new laptop at the time), and he was right this was the recent flow i used:

1)use z spheres for basic shape
2) sculpt in all the details at high poly (this would include all the detail of normal map creation)
3)Decimate model
4)Export to 3d coat (excellent programme) and create a low poly mesh using the decimated mesh as reference  then export the low poly model for unwrapping in max. you can also bake a diffuse map in 3d coat at this point if you've painted your decimated z brush model.
5)I at this point went back to z brush and exported the un-decimated model for normal map baking in max, and because it was just a head max took it well, but other wise id think again.

This is where i am now:


This is obviously unfinished but i am liking this process its faster and the benefits of taking the low poly from the high instead of the other way round has clear benefits. I've also found that instead of worrying about sculpting too heavily on a mesh in z brush that's taken from max, I am free to sculpt as heavily or lightly as is needed.
However I will say that for all people who want to create characters that starting from scratch with nothing in max is the best way to learn topology nd to understand how the face is shaped so that sculpting then becomes easier. In this instance im glad I started in max as sculpting in z brush and then retopologising in 3d coat came easilly to me.


Huge setbacks and the discovery of Feng Zhu

Well i have just had the largest setback I think il ever have. My computer almost literally died after i, quote "spent 3 years running it to death" Im currently trying to retrieve my programmes and although I backup all of my work on a monthly basis a back up was actually due when it broke. So I am also having someone try to retrieve my work as well, because anyone who has had max crash on them will tell you alot can happen in three minutes alot more can happen in a month.
There are upsides to this incident however, its become obvious I have been neglecting drawing which is a bad move so I have been sketching anything and everything.

Recently I was told about an amazing designer Feng Zhu  by a good friend of mine. In this video http://www.youtube.com/watch?v=aDNhFLcsgh8 Feng Zhu explains the usual types of drawing techniques (drawing from eye, grid etc) and a fourth thinking of objects in 3d space. This video has been revolutionary to me and even in such a short space of time i have seen a vast improvement in my work, instead of just mindlessly drawing without a second thought I can now visualize the shapes and forms of the objects i draw.
This technique i suspect will help with perspective, posing of characters and the weight behind a characters clothing and movement.

Saturday, 2 February 2013

Biker- 2nd feb

This is a current render of the model as is:
In the interest of trying to create an as acurate as I can skin texture usig the ss skin shader I have also plugged in an epidermal and subdermal skin texture. Im happy with the texture in an ideal world Id like it to be clearer however because I have the entire body on the the same texture this will generally be the outcome.
There also seems to be an odd lighting problem with the teeth and around the eye which I will go back and fix.

Thursday, 31 January 2013

Biker- Problems

During the rigging process (after modelling a base mesh I like to create a basic rig to text the joints) I found that there was a problem with the joint lengths So i screenshot the model in orthographic and in Photoshop drew the head lengths:
It became clear that the calf was not long enough which was an easy enough problem to fix.

I also rendered out the head to put down the facial problems.
This was an early render before I began using the photos for the skin texture i found a substantial amount of problems with not only the facial shape but also the texture.

Biker- early model

Like with most character models I decided to start by strip modelling. I also decided to start with a low ply base mesh then up the tri count when i sculpt out the normal map in z brush and then export out a subdivided version of the mesh.

This is one of the early renders of the lowest subdivisions.
 I found at this stage that the models face looked a bit too feminine which is another benefit of using z brush as i like to quickly and effectively alter the face using the move tool.
Texturing:
To start I render out base colours using the render to texture tool in max. But instead of using z brush to paint out the skin colour I decided that i wanted the model to look as realistic as possible so i decided to use photos for the skin and the clothes. However I decided to still use z brush to sculpt the clothes folds and some of the wrinkles in the face.
I also decided to use a very low fill lighting map layer as in the past I've found that if the layer is too heavy it muddies up the texture.


Saturday, 19 January 2013

Biker-handles

One of the things that initially drew me to this man was the handles he was wearing around his waist, so i am keen to include them.
I have researched different types and designs of biker handles
1: I like the weight that this design has it looks professional
2: I like this design however I feel it would cover up too much of the jacket and is not close enough to the one the man was wearing.
3:this design is similar to 1 i like the small details like the clips and the varying materials.
4 this is the closest design to the one the man was wearing however i feel its a bit boring.
5 is research into number 3 the brand and design. this is the design i will base his handles on.


Thursday, 17 January 2013

Biker

I have also recently started to work on a separate project. Whilst waiting for a lift a man caught my eye, or the folds in his fleece did and whilst staring at said fleece i decided id model him here is an early sketch i did of him when i got home:
Pencil sketch 
Painted with Acrylic 

Next I will take him into design and decide what parts of him will stay until the final piece and what parts I will alter, I will start be researching different biker jackets.
1: like the look of the reinforced sleeves i feel it makes him look tough
2:For the same reason as number 1 i will look into the reinforces shoulder pads
3:I like the stripes as it gives an opportunity to add a small amount of colour to the jacket.
4: I feel the zips down the front of the jacket would be one of the small details that would complete the look of the finished model. 
5:Adding zips and poppers gives the jacket interest and will add to the realism I'm trying to create which is why I like this collar and the zips on number 6.

I will now put my research into a final drawing of the jacket and then continue by researching the biker handles he wore at his waist. I will look into the materiel's they are made from and their mechanics so that there will be no flaws in my model.


Wednesday, 16 January 2013

Pedestrian- Background Character

I also compressed the previous two texture sheets (one for the head and a separate one for the body) into one texture map as I felt it would illiminate the need for multi sub objects in max. I have recently managed to get my work flow down to a few easy simple steps that make the whole process from design creation and finish quicker. One of these steps is to create a tile-able texture e.g. denim and overlay it using the new pattern layer option in Photoshop over the base material colour to create a realistic effect. This layer can then be used to create a separate layer to help create material weaves within the Normal map. I find that this method combined with the normal maps I generate in z-brush creates a realistic effect.


These are the new and improved versions of the pedestrian. I found that being scrupulous in detail like adding small parts that would appear on a regular human beings on their clothes and shoes and on their bodies adds to the realism of the piece and i am particularly proud of this model as the leap of quality between the previous piece and this one is massive and shows just how far i have come in technique both in max and the use of z-brush and even rigging.